Welcome

Welcome to my Cobra Replica build blog.
Please contact me if you would like to know more detail as i progress."CR3514@live.com.au"
Regards
Dave

Sunday, July 29, 2018

Body Work

Getting prepared for paint.
Lots of bits and pieces to mount to the body, so in preparation before painting, i'm mounting all the items to make sure i'm happy with the placement, pre-drilling mounting holes and tweaking gaps so reassembly after paint is as pain free as possible.


First job was to secure the windscreen, in this pic you can see the gap between the windscreen blade that protrudes through the body slot and the gap to the hoop mount bracket.
there is 2 bolt holes to align on each side, 1 on top of the hoop, and 1 on the hidden side of the hoop.
Made 4 spacers, 2 at 10mm thickness f.or the pictured passenger side, and 2 at 6.5mm thickness for the drivers side.


Once the screen was in its correct location, mounted and marked the body holes for the windscreen centre mount l bracket then moved on to the Custom made race screen mount.
Worked out all the hole spacing's for the mount and drilled through Aluminium mount and body.

In this pic you can also see the normal windscreen demister vent.


Underneath the dash showing the demister vent slot.

I don't plan to fit a demister to the car, but installed the slots and vents for later use if i have to fit, I've allowed enough room between the under dash hoop and the dash panel.


Passenger side demister vent fitted.


Also bought a 3rd mirror to use as rear view mirror in keeping with the race look.
I have a normal windscreen mounted mirror as well if needed to get through engineering and registration.


Hand brake mounted in place.

This hand brake lever is from Ford Falcon BA/BF (part number  BA 2760 B1)
The chassis has a bracket pre-mounted for this specific item.
Mine is from a sports model with the leather grip which matches in with seat colour perfectly.


Hand Brake Cable goes through the body to the Lever.
Made up an aluminium cable guide so the cable doesn't rub on the fibreglass.
Its mounted on a plastic washer on the outside and held in place with a stainless washer and "E" clip on the inside.


Hand Brake Cable Guide from the inside of the cabin area.


Seat Belt slots had to be widened slightly to fit the buckles through.

The seat belts are horizontal mounted retractors mounted on the chassis immediately behind the rear Bulk Head.

These belts are aftermarket APV units model number K2578.
While the kits come complete with Bolts, Spacers, and Swivel Bushes, there are no nuts ? apparently nuts are optional extras.
so off to the bolt bloke for some 7/16" UNF nylock nuts.


Belt Retractors mounted behind the Bulk Head on the Roll bar chassis mount.


Seat Belt Buckle. think i need a shorter stalk.


one bonnet handle in, one to go.


Started on the bonnet gaps but decide it was best to get the latches and handles in first so the final resting place was locked in.

The gaps are a bit wild, so sanding to about 3.5mm then will put a radius on the edge to match the body
A couple of spots may need to be built up a bit.


Bought a couple of Badges from Finish Line Accessories awhile back with Vents, Mirrors, other bits and pieces. etc.

Mounted on the centre line .

Thursday, July 5, 2018

Seats - Front Row & First Class

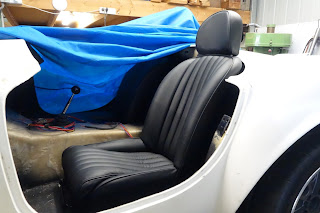
Classic Revival make an ADR approved seat for their kit, but I wanted a more traditional looking seat.
Classic & Sports Auto Interiors in Eltham  make such a design and is a popular choice with Cobra builders throughout Australia regardless of the brand.
I settled on Leather in Black Charcoal, a Standard material and colour for C&S.
The finish is excellent with the only modification being seat warmers installed in both.

The headrest is a necessity under ADR 03/03 requirements, and the design by C&S is a nice shape and overall doesn't detract too much from the whole look, i'm very happy with them.


Both seats bolted in position after final alignment and mounting tweaks.


Left hand passenger Seat.
The seat backs sit a little higher than original, but this is a distance (height) specification in the ADR 03/03 design regulations from the hip joint to the top of the seat back.


After sitting in them, I canted the fronts of the cushion slightly to the outside for 2 reasons.

Better alignment with the pedal locations on the drivers side, and allow the seat to slide fully forward on the runners without hitting the centre tunnel.


The seat tracks sit on spacer plates to raise them about 10mm for a better leg angle and to bridge the differences between the CR factory seat location mounts and the Classic & Sports Seat Track mounting hole locations.

I actual cut the drivers seat mounts only once, luck of the draw, but ended up doing the passenger set 3 times due to differences in the locations and getting the gaps  between seat and body even.

Off the Hook - Rear Tow Hook

The front Tow Hook point was a Rally Tech Product designed for a Mitsubishi EVO, and mounted to the chassis fairly simply with custom angle bracket.
The rear has limited mounting options and with insufficient strength so the same Tow Hook could not be used.
I designed up a Tow Hook point similar in design to be through bolted through the rear chassis fuel tank mount frame.

As the Tow hook is mounted to the rear cross tube, its a bit "flexible"  if given a jolt, so i made a 6mm flat brace from the tow hook mounting triangulated back to the original Roll Bar mount on the chassis. this has stiffened up that section significantly.
The brace is mounted inside the boot area on the floor.


Milled from some 16mm Aluminium, then faced on both sides to 15mm thickness to match the front Tow Hook.


Powder coated in Fire Extinguisher Red.
It was close colour match to the front Tow Hook and a regular stock colour that Best Coatings in South Dandenong use in their production.


A spacer block lowers the Tow Hook so it has clearance beneath the rear of the body.

The holes through the tube have a steel tube inserted so the bolts don't crush the tube when tightened.


In this pic, you can see the strap brace going from the Tow Hook Mount position to the original Roll Bar 3rd Leg mount location on the chassis.

I used this strap and a another little plate to cover the fuel tank strap bolt location.

Also in this pic you can see the Quick Jack Mounts that protrude through the Boot Floor and the cover plates to seal up the opening.


Cover Plates are 1.2mm Aluminium sheet stock cut to size and will be screwed to the floor with 4mm Button Head Screws.