Welcome

Welcome to my Cobra Replica build blog.
Please contact me if you would like to know more detail as i progress."CR3514@live.com.au"
Regards
Dave

Saturday, March 15, 2014

Throttle Body Studs

Today I mounted the throttle bodies on the manifold with some stainless steel studs to suit the 1 inch throttle body spacer.

I prefer studs for mounting the manifold and throttle bodies.

Need to figure out how to mount the throttle cable.


The studs have dome  ends on them, havent seen these before but the look well finished.
These are ARP brand.

Injector Adaptors

(Mod - See future post for change to LS3 Dual Quad Inlet manifold)

Had a day at home by myself last time i was home, so after it got too hot doing jobs around the place, I spent the afternoon in the shed.

The Holley manifold i've got and the fuel rails are made to suit either a pico injector or the older taller LS1 style injectors, but i want to keep the LS3 ones, so i set about making an adaptor to bridge the gap from injector top to fuel rail, and to lift the fuel rail a little further away from the injector loom connector.
The fuel rails look too tall on the upper mount setting, so i'm going to make adapters that will space the fuel rail about half way and consistent to having LS2 type injectors in case i ever need to change them out.


You can see the gap to bridge between the injector and the rail in this pic.
On the lowest rail setting, the injector is still about 12mm short from seating in the rail.
After a measure up, of the gap, manifold hole and rail holes, i made some adaptors to fit the gap, and added some new Viton O-Rings.


Some aluminium stock in the lathe


This is extender no 2, the 1st adapter was machined from the 'O' ring end and became difficult to machine the injector cavity without damaging the 'O' ring end.
The end mill would spin the finished part in the chuck due to the small clamping area.

In this pic, I've faced the stock, bored and chamfered the injector cavity, drilled the fuel hole, then profiled the adapter.


Next step was to part off and chamfer the adapter end.


Here is the finished part on an injector.
6 more to go.


Mounted on the manifold, 


Pre-assembled, just need to drill and tap the rail posts to lock it all up together.


Thursday, March 6, 2014

Inlet Manifold Adaptor Flange

(Mod - See future post for change to LS3 Dual Quad Inlet manifold)

After considering the best way to cut and fill the manifold ports to match the LS3 heads, I've decided not to potentially ruin the inlet manifold and will make up some adapter plates.
10 or 12 mm Aluminium plate is all I will need to smoothly transition the ports without sacrificing cross sectional area.
This will lift the manifold vertically approx 12 to 14 mm depending on flange thickness.

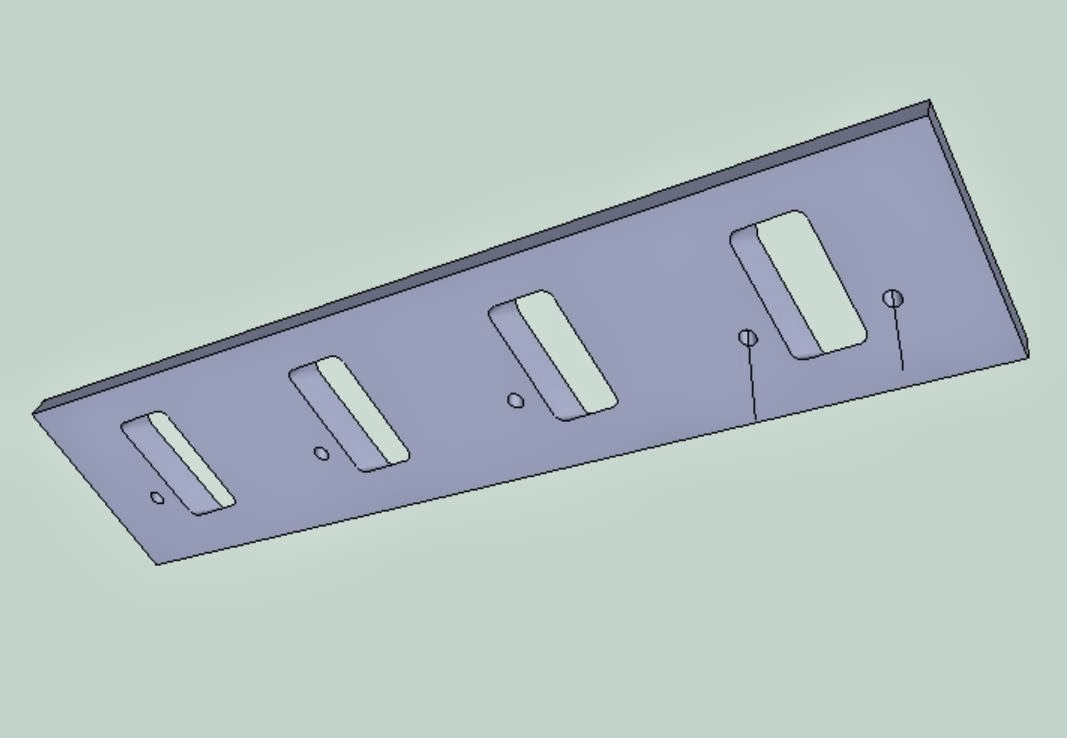
Here's some CAD pics of the concept.

From the Cathedral Port Side (Inlet Manifold)


From the Square Port Side (Head)


Picture showing the port walls morphing between
Cathedral profile and Square Port profile.


The port wall surface data is what I will use to create the machine tool path for the CNC Mill.

The far port wall in this pic you can see is an undercut, meaning i will have to cut a vertical wall on this side in the first pass, then flip the part on my machine to finish this tapered face profile.