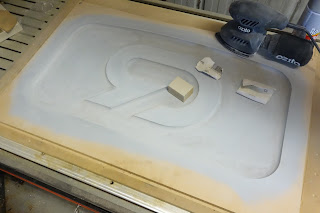
A bit out of sequence this post, but got some more progress on the Battery Compartment Cover Mould as well.
After milling out the profile in MDF, I've given the cut surface a spray with primer sealer to protect it a bit from moisture absorption.
a few coats and sanding then I'll paint it with a top coat and wax polish it ready to take a fibreglass panel off it.
Only needs to do one. :) ...one good one .
Welcome
Welcome to my Cobra Replica build blog.
Please contact me if you would like to know more detail as i progress."CR3514@live.com.au"
Please contact me if you would like to know more detail as i progress."CR3514@live.com.au"
Regards
Dave
Dave
Thursday, March 15, 2018
The Body is On...Again
Finally stopped procrastinating and getting distracted with fiddly jobs and enlisted Mrs.W to help me put the body back on the chassis.
It wasn't without emotional pain or damage unfortunately, half way through lowering it, I had to remove the oil cooler to get the lower oil cooler body opening over the front outrigger bar.
In the process of lowering the body, I forgot to remove a wiring loom earth bolt on the chassis out rigger that secures the inner front wheel arch, cracking the fibreglass and chipping a bit of paint.
Should be an easy repair at some point down the track, but annoying all the same.
Thankfully, Diane is immune to my expletive rants. Thank you truly.

Ready....

Set....
Used bike tie down straps to hold up the body. These make for easy adjustment of the install angle.
Front has to clear everything then body pushed backwards and held against the outrigger while lowering for the body to clear the engine and quick jack mounts that protrude up through the boot floor..

Go !

Oh No, something went crunch.....
I'll clean this up by putting tape over the back of the wound to secure it, then bonding with resin, reshape, then remove the tape and do on the back side before touching up.
Up on the hoist for a panoramic pic and a look to see if any wiring or other items pinched between the body and chassis.
All looks good.

Spent a fair time tweaking the body on the chassis to get it as square and levelled as possible before installing mounting bolts.

Installed the bonnet mounting brace loosely,
Its the black bracket in the background behind the PWM fan controller.
The Fan controller is a corvette part and is pulse width modulated by the ECU to provide variable fan speed based on engine temperature.

Put the bonnet on and packed it up to be levelled to the bonnet opening then tightened up the bolts to the hinge so it aligned with the mounting brace.
then positioned the brace to align with the hinge pivot tube.
Tightened up the brace bolts that sandwiches the body and chassis with the brace.
Attached the bonnet struts and removed the packing.
Next step is to make some hinge pins with removable clips for easy removal of the bonnet when required.
It wasn't without emotional pain or damage unfortunately, half way through lowering it, I had to remove the oil cooler to get the lower oil cooler body opening over the front outrigger bar.
In the process of lowering the body, I forgot to remove a wiring loom earth bolt on the chassis out rigger that secures the inner front wheel arch, cracking the fibreglass and chipping a bit of paint.
Should be an easy repair at some point down the track, but annoying all the same.
Thankfully, Diane is immune to my expletive rants. Thank you truly.

Ready....

Set....
Used bike tie down straps to hold up the body. These make for easy adjustment of the install angle.
Front has to clear everything then body pushed backwards and held against the outrigger while lowering for the body to clear the engine and quick jack mounts that protrude up through the boot floor..

Go !

Oh No, something went crunch.....
I'll clean this up by putting tape over the back of the wound to secure it, then bonding with resin, reshape, then remove the tape and do on the back side before touching up.
Up on the hoist for a panoramic pic and a look to see if any wiring or other items pinched between the body and chassis.
All looks good.

Spent a fair time tweaking the body on the chassis to get it as square and levelled as possible before installing mounting bolts.

Installed the bonnet mounting brace loosely,
Its the black bracket in the background behind the PWM fan controller.
The Fan controller is a corvette part and is pulse width modulated by the ECU to provide variable fan speed based on engine temperature.

Put the bonnet on and packed it up to be levelled to the bonnet opening then tightened up the bolts to the hinge so it aligned with the mounting brace.
then positioned the brace to align with the hinge pivot tube.
Tightened up the brace bolts that sandwiches the body and chassis with the brace.
Attached the bonnet struts and removed the packing.
Next step is to make some hinge pins with removable clips for easy removal of the bonnet when required.
Subscribe to:
Comments (Atom)

